Midway: The Carrier Battle That Turned an Ocean
In June 1942, US codebreakers handed three carrier task forces foreknowledge of a Japanese ambush, and when dive bombers arrived at precisely the right moment on 4 June, Japan lost four fleet carriers and the strategic initiative of the Pacific War in a single afternoon.
18 min read 14 sources
It is 04:30 on 4 June 1942, and Vice Admiral Chuichi Nagumo is launching his aircraft from the dark North Pacific. The targets are the sand-and-coral spits of Midway Atoll, 240 miles to the southeast. What Nagumo does not know — what Yamamoto’s entire Combined Fleet does not know — is that three American carrier task forces are already in position northeast of Midway, waiting. They have been there since June 2nd.
The Battle of Midway, fought 4–7 June 1942, is the most studied naval engagement of the twentieth century — and one of the most mythologized. The popular version, assembled from Mitsuo Fuchida’s unreliable 1955 memoir and fixed in place by the 1976 film, offers a “five-minute miracle”: Japan’s carriers were seconds from launching a devastating strike when American dive bombers arrived from nowhere and destroyed them in a single, improbable moment of luck. That version is wrong in almost every particular — wrong on the timing, wrong on what was where on which deck, wrong on why the carriers burned so catastrophically.
The real story is less miraculous and more interesting. It is a story about the structural power of intelligence — how Commander Joseph Rochefort’s Station HYPO codebreaking operation handed Nimitz a precise prediction of when and where the Japanese would strike, and how Nimitz acted on that prediction with a precision his Japanese counterpart never suspected. It is a story about Nagumo’s genuine dilemma, about the sequential grinding down of Japanese air defenses by torpedo squadrons that never scored a hit but died to make the final stroke possible, and about the accident of timing that brought three separate American dive-bomber groups over three Japanese carriers at almost exactly the same moment.
Five minutes had nothing to do with it.
The Road to Midway: Six Months of Japanese Advance
Pearl Harbor on 7 December 1941 did not destroy the American carrier force.
The six months that followed Pearl Harbor were months of Japanese strategic expansion on a scale never before achieved in the Pacific. Japanese forces seized Wake Island, the Philippines, Hong Kong, Malaya, Singapore, the Dutch East Indies, and Burma with a speed that stunned Western capitals. By spring 1942, Japan’s defensive perimeter extended from the Aleutians to New Guinea. And yet the US carriers remained at large, striking back in raid after raid — the Doolittle Raid on Tokyo in April 1942 was the most psychologically significant, but the Coral Sea in early May 1942 was strategically the more consequential.
Yamamoto’s response to the unfinished business of the carrier war was Operation MI — the seizure of Midway Atoll and the destruction of the American carrier force in a single decisive engagement.
For Midway, the Kido Butai would field four fleet carriers: Akagi, Kaga, Soryu, and Hiryu — with Shokaku and Zuikaku out of action. The absence of those two veteran carriers and their experienced air groups is one of the structural facts that shaped what followed.
Event 1 of 9: 7 Dec 1941, Pearl Harbor — but the US carriers survive
Pearl Harbor — but the US carriers survive
Japan's attack destroys 8 battleships and 188 aircraft. But all three US Pacific Fleet carriers — Enterprise, Lexington, Saratoga — are at sea. The Pacific War's carrier-vs-carrier character is set from day one.
US carriers begin raiding strikes
Halsey's Enterprise-Yorktown task forces raid Marshall and Gilbert Islands, demonstrating that US carriers cannot be ignored. Yamamoto accelerates planning for a decisive engagement.
Doolittle Raid on Tokyo
16 B-25s launched from Hornet strike Tokyo and four other Japanese cities. Physical damage minimal, but psychological shock enormous. Yamamoto's argument for seizing Midway — to extend Japan's defensive perimeter and prevent further American raids — gains political weight.
Battle of the Coral Sea begins
The first carrier battle in history — no surface ship sees another. US loses Lexington; Yorktown damaged. Japan loses Shoho; Shokaku damaged; Zuikaku aircrew depleted. Both large Japanese carriers are unavailable for Midway.
Station HYPO decrypts Operation MI
Commander Joseph Rochefort and Station HYPO — the Pearl Harbor codebreaking unit — piece together the target of the Japanese operation from partially decrypted JN-25b messages. The target is identified as 'AF.'
The water ruse confirms 'AF = Midway'
At Nimitz's request, Midway sends a fake plain-language radio message reporting its water distillation plant broken. Within days, Japan's own intercepts, decrypted by HYPO, report 'AF is short of water.' The target is confirmed beyond doubt.
Layton briefs Nimitz: attack June 4–5, bearing 325°, ~175 miles out
Fleet Intelligence Officer Edwin Layton's prediction would prove accurate to within five miles and five minutes. Nimitz orders his carriers to sea.
US task forces rendezvous at 'Point Luck'
TF16 (Enterprise + Hornet, under Rear Admiral Raymond Spruance) and TF17 (Yorktown, under Rear Admiral Frank Jack Fletcher) meet 350 miles northeast of Midway. Fletcher takes overall command. They wait.
PBY patrol planes spot Japanese invasion fleet 700 miles out
Army B-17s from Midway attack the Japanese transport force but score no hits on the moving ships. The main carrier striking force — Kido Butai — is not yet sighted. Nagumo maintains radio silence.
The codebreaking story is, in retrospect, the hinge of everything. Without it, three American carriers would have been groping in the wrong quadrant of the Pacific when Nagumo struck Midway. With it, Nimitz had not just warning but specifics: the attack was expected on 4–5 June, from the northwest, at approximately 175 miles’ distance, around 0700.
The Forces
The two forces that met at Midway in June 1942 were not evenly matched on paper. Japan had numerical carrier superiority and the initiative; its Kido Butai was the most experienced and battle-tested carrier striking force in the world. What equalized the battle — and ultimately reversed it — was intelligence, geography, and the compound failures of a plan that assumed surprise.
- Route 1 (march): Kido Butai sortie from Hashirajima (May 27) toward Midway
- Route 2 (march): Japanese approach (bearing 325° from Midway)
- Route 3 (march): Yamamoto's Main Force (Combined Fleet) — ~600 miles behind Kido Butai
- Route 4 (march): TF16 + TF17 sortie from Pearl Harbor — Point Luck, NE of Midway
- Point: Midway Atoll
- Point: Pearl Harbor
- Point: Point Luck (US TFs, June 2)
- Point: Hashirajima (Japan)
- Point: Aleutians (diversion)
- Japan: 80
- United States: 70
The Kido Butai — Nagumo’s carrier striking force — sortied from Hashirajima on 27 May 1942 with four fleet carriers.
- Fleet carriers1.3:1
- Carrier aircraft1.1:1
- Land-based aircraft (Midway)—
- Escort warships1.4:1
| Metric | Japan (Kido Butai) | United States (TF16 + TF17) | Ratio |
|---|---|---|---|
| Fleet carriers | 4 ships | 3 ships | 1.3:1 |
| Carrier aircraft | 248 planes | 233 planes | 1.1:1 |
| Land-based aircraft (Midway) | 0 planes | 122 planes | — |
| Escort warships | 11 ships | 15 ships | 1.4:1 |
Imperial Japanese Navy — Kido Butai (First Mobile Force)
cmd Vice Admiral Chuichi Nagumo (flagship: Akagi)
3 formations
-
CarDiv 1 — Akagi and Kaga fleet 134 aircraft
- Akagi 60 aircraft VF: 18 A6M Zero; VB: 18 D3A2 Val dive bombers; VT: 18 B5N2 Kate torpedo bombers + 6 reserve
- Kaga 74 aircraft (72 per Parshall/Tully) VF: 18 Zero; VB: 18 D3A Val; VT: 27 B5N Kate + 11 reserve — unusually large torpedo-bomber component. NHHC H-Gram 006-1 gives 74; Parshall/Tully give 72 operational (difference: counting of reserve/attached aircraft)
-
CarDiv 2 — Soryu and Hiryu fleet 114 aircraft
- Soryu 57 aircraft VF: 18 Zero; VB: 18 D3A Val; VT: 18 B5N Kate + 3 reserve
- Hiryu 57 aircraft VF: 18 Zero; VB: 18 D3A Val; VT: 18 B5N Kate + 3 reserve. Sole survivor of the first US strike
-
Escort screen — CruDiv 8 + DesRon 10 fleet 11 warships
- Heavy cruisers Tone and Chikuma Each carried 6 floatplane scouts. Tone's #4 scout was delayed 30 minutes by a catapult malfunction — a delay with major consequences for the battle
- Battleships Haruna and Kirishima Anti-aircraft escort
United States Pacific Fleet — Task Forces 16 and 17
cmd Rear Admiral Frank Jack Fletcher (TF17, overall command); Rear Admiral Raymond A. Spruance (TF16)
3 formations
-
Task Force 17 — USS Yorktown (CV-5) fleet 75 aircraft
- VF-3 (Fighting Three) 25 F4F-4 Wildcat Fighter squadron; 6 aircraft provided as escort for VT-3 torpedo bombers — an escort that suffered heavily
- VB-3 (Bombing Three) 18 SBD-3 Dauntless Under Lt. Max Leslie; would sink Soryu on June 4; Leslie accidentally dropped his own bomb before the attack due to faulty arming
- VS-5 (Scouting Five) 19 SBD-3 Dauntless Secondary dive-bomber element
- VT-3 (Torpedo Three) 13 TBD-1 Devastator Under Lt. Cdr. Lance Massey (killed in action); attacked Hiryu; 10 of 12 attacking planes lost, no hits
-
Task Force 16 — USS Enterprise (CV-6) and USS Hornet (CV-8) fleet 158 aircraft
- Enterprise air group (VF-6 / VB-6 / VS-6 / VT-6) 79 aircraft (27 F4F-4, 19+19 SBD, 14 TBD) VB-6 under Lt. Cdr. Richard Best; VS-6 under Lt. Cdr. Wilmer Gallaher. Key: Best's dive on Akagi was an improvised redirect — most of VB-6 dived on Kaga by coordination error, and Best pulled off to hit Akagi with just two wingmen
- Hornet air group (VF-8 / VB-8 / VS-8 / VT-8) 79 aircraft (27 F4F-4, 19+18 SBD, 15 TBD) VT-8 under Lt. Cdr. John C. Waldron. The most famous unit of the battle. Waldron found the carriers by dead reckoning when navigation failed; all 15 TBDs shot down, 29 of 30 aircrew killed. Sole survivor: Ensign George Gay, who watched the dive-bomber strike from the water
-
Midway Island Air Garrison (USMC, USAAF, USN patrol) wing ≈122–127 aircraft
- PBY Catalina patrol planes 31–32 The early-warning net. A PBY found the Japanese carrier force at 05:34; a second confirmed the inbound strike at 05:45
- USMC fighters (VMF-221) 20 F2A Buffalo + 7 F4F Wildcat Badly outclassed by Zero escort fighters; 13 Buffalos and 2 Wildcats lost intercepting the Japanese first wave
The Japanese formation had a structural weakness that would prove fatal: its seven search planes, launched at 04:30 to scout 300-mile sectors ahead of the fleet, were insufficient to cover the approaches — and one of them, Tone’s number 4 floatplane, was launched 30 minutes late due to a catapult malfunction.
The Battle: Phase by Phase
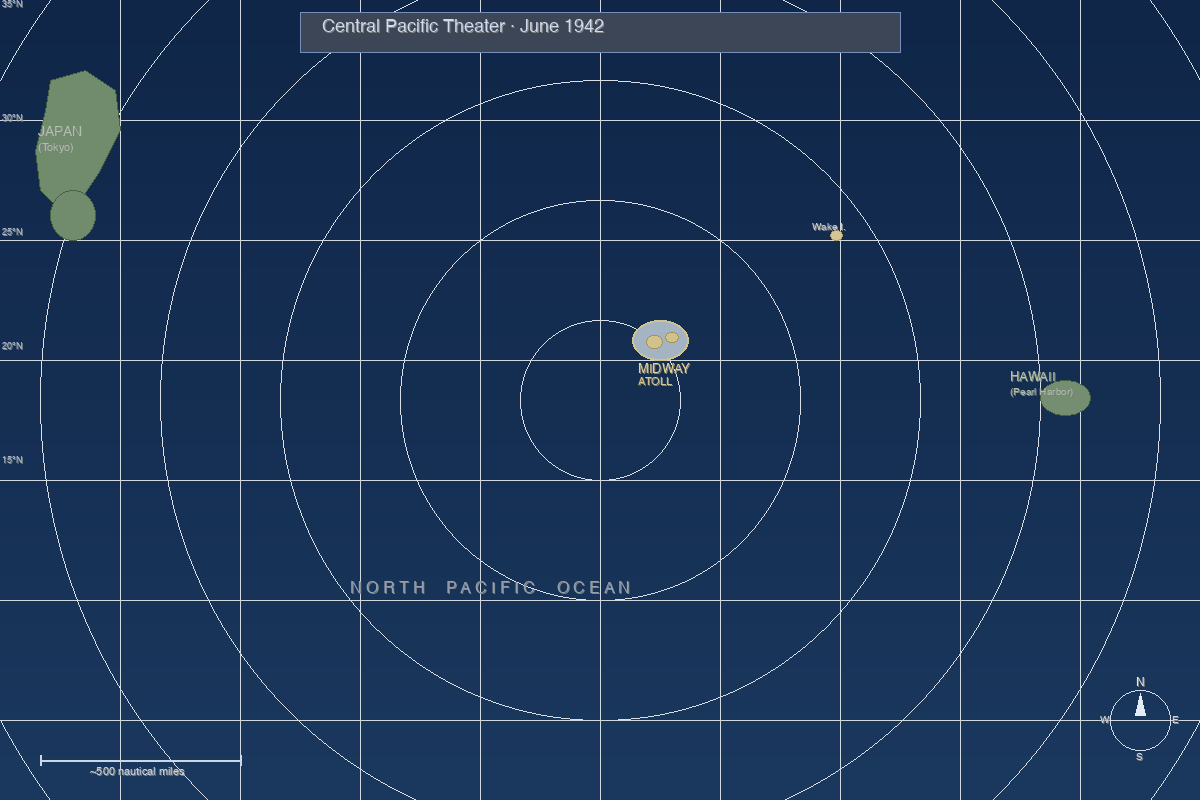
Phase 1 of 6: Pre-battle: Japanese approach + US positioning
- Japan (Kido Butai)
- United States (TF16 + TF17)
- infantry
- armor
- cavalry
- artillery
- hq
- naval
- air
- Pre-battle: Japanese approach + US positioningMay 28 – June 3Japan's Kido Butai approaches from the NW in radio silence. US carriers hold at 'Point Luck' NE of Midway. Midway-based PBYs run daily search arcs. US carriers are outside Japanese search range until Kido Butai is sighted June 3.
5 units · 2 fronts
- Japan (Kido Butai) naval — Kido Butai (Nagumo) (4 carriers, 248 aircraft)
- Japan (Kido Butai) hq — Yamamoto's Main Force (far NW) (Yamato + fleet)
- United States (TF16 + TF17) naval — TF16 (Spruance — Enterprise, Hornet) (2 carriers, 158 aircraft)
- United States (TF16 + TF17) naval — TF17 (Fletcher — Yorktown) (1 carrier, 75 aircraft)
- United States (TF16 + TF17) air — Midway garrison aircraft (≈122–127 planes)
- Phase 1: Nagumo strikes Midway; first wave launches (04:30, June 4)04:30 – 07:00Nagumo launches 108-plane first wave against Midway. Midway fighters scramble — outclassed. Japanese bomb Midway hard but runways remain operational. Tomonaga radios: second strike on Midway required. 7 Japanese search scouts fan out — Tone #4 is 30 min late.
4 units · 1 move · 1 front
- Japan (Kido Butai) naval — Kido Butai — 4 carriers (248 aircraft)
- Japan (Kido Butai) air — 1st wave: 108 aircraft (36 Val + 36 Kate + 36 Zero) (108 planes)
- United States (TF16 + TF17) naval — TF16 + TF17 (NE, alerted) (3 carriers)
- United States (TF16 + TF17) air — Midway fighters intercept (outclassed) (20 F2A + 7 F4F)
- Japan (Kido Butai) attack — First wave → Midway (108 planes)
- Phase 2: Nagumo's dilemma — rearm order and reversal (07:15 – 09:18)07:15 – 09:1807:15: Nagumo orders reserve rearmed bombs → contact bombs for 2nd Midway strike. 07:40: Tone #4 scout reports US surface force (no carrier yet). 08:20: Scout confirms carrier present. Nagumo reverses: back to torpedoes. Yamaguchi urges immediate launch; Nagumo waits to recover first wave. Midway planes attack Kido Butai in waves — zero hits.
4 units · 2 moves
- Japan (Kido Butai) naval — Kido Butai (rearming, recovering first wave) (4 carriers)
- Japan (Kido Butai) air — Returning 1st wave (Tomonaga) (~90 survivors)
- United States (TF16 + TF17) air — Midway attack waves (B-17s, TBFs, SBDs, B-26s) (63 planes, zero hits)
- United States (TF16 + TF17) naval — US carriers prepare strike (launching begins) (3 carriers)
- United States (TF16 + TF17) attack — Midway attacks (all fail)
- United States (TF16 + TF17) advance — US carrier strike launches
- Phase 3: Torpedo squadrons — sacrifice and the degradation of the CAP (09:18 – 10:10)09:18 – 10:10Three US torpedo squadrons attack in sequence. VT-8 (Hornet): all 15 TBDs shot down, 29/30 crew KIA. VT-6 (Enterprise): 10 of 14 lost. VT-3 (Yorktown): 10 of 12 lost. Zero hits. But: Japanese CAP — fighting for 2+ hours — is exhausted, low on fuel, and concentrated at low altitude. Dive bombers are en route from high altitude.
4 units · 1 move
- Japan (Kido Butai) naval — Kido Butai (maneuvering, recovering aircraft) (4 carriers)
- Japan (Kido Butai) air — CAP Zeros (forced to low altitude) (~24 fighters)
- United States (TF16 + TF17) air — VT-8: all 15 TBDs lost, 29/30 KIA (09:18) (15 → 0 TBDs)
- United States (TF16 + TF17) air — VT-6: 10/14 lost (09:40) + VT-3: 10/12 lost (10:05) (26 → 8 survivors)
- United States (TF16 + TF17) attack — VT-8, VT-6, VT-3 attack in sequence
- Phase 4: The dive-bomber strike — three carriers in six minutes (~10:22–10:25)10:22 – 10:25VB-6/VS-6 (Enterprise) arrive at altitude and dive: Kaga hit by multiple bombs; Best's element redirects to Akagi (1–2 hits, carrier ablaze). VB-3 (Yorktown) dives on Soryu (3 hits). Three carriers mortally wounded in minutes. Hiryu — screened north — survives. Note: carriers were NOT launching aircraft from the flight deck; strike planes were in the enclosed hangar decks, being rearmed — making the sealed hangars fatal furnaces.
6 units · 2 moves · 1 front
- Japan (Kido Butai) naval — Akagi (burning) — Nagumo transfers flag (mortally hit)
- Japan (Kido Butai) naval — Kaga (burning, Capt. Okada killed) (mortally hit)
- Japan (Kido Butai) naval — Soryu (burning, Capt. Yanagimoto stays aboard) (mortally hit)
- Japan (Kido Butai) naval — Hiryu — survives; CarDiv 2 (Yamaguchi) (intact, ~57 aircraft)
- United States (TF16 + TF17) air — VB-6/VS-6 (Enterprise) → Kaga + Akagi (32 SBDs)
- United States (TF16 + TF17) air — VB-3 (Yorktown) → Soryu (17 SBDs)
- United States (TF16 + TF17) attack — VB-6/VS-6 dive on Kaga + Akagi
- United States (TF16 + TF17) attack — VB-3 dives on Soryu
- Phase 5: Hiryu counterstrikes — Yorktown crippled; Hiryu sunk (11:00–17:00)11:00 – 17:00Yamaguchi launches Hiryu's airgroup in two waves. First wave (18 Vals): ~12:05, 3 bomb hits on Yorktown — boilers out, flight deck holed. Second wave (10 Kates): ~14:30, 2 torpedo hits; Yorktown lists severely, abandoned ~15:00. Then: Enterprise launches 24 SBDs. ~17:00: Hiryu struck (4 hits), mortally wounded. By nightfall all four Japanese carriers are burning.
5 units · 2 moves
- Japan (Kido Butai) naval — Hiryu (launching strike against Yorktown) (2 wave strikes)
- Japan (Kido Butai) air — Hiryu 1st wave: 18 Vals → Yorktown (12:05) (18 D3A Val)
- Japan (Kido Butai) air — Hiryu 2nd wave: 10 Kates → Yorktown (14:30) (10 B5N Kate)
- United States (TF16 + TF17) naval — Yorktown (hit twice, abandoned ~15:00) (crippled)
- United States (TF16 + TF17) air — Enterprise retaliation: 24 SBDs → Hiryu (~17:00) (24 SBD)
- Japan (Kido Butai) attack — Hiryu strikes (2 waves)
- United States (TF16 + TF17) attack — Enterprise SBDs sink Hiryu
Phase 1 — Nagumo Strikes Midway
Nagumo’s first wave launches at 04:30 on 4 June.
One of those scouts, Tone’s number 4 plane, is supposed to cover Sector 5. Its catapult is malfunctioning. By the time it launches, it is 30 minutes late. That delay will not seem significant for another three hours.
A PBY Catalina patrol plane spots Nagumo’s carriers at 05:34 and radios the contact.
The result is not a contest. Marine pilots flying Buffalos — a plane their own officers described as suitable only for advanced training by 1942 — are slaughtered.
This is the message that starts the chain of decisions that destroys the Kido Butai.
There is need for a second attack wave.
Phase 2 — Nagumo’s Dilemma
At 07:15, Nagumo makes a decision that will be debated for the next eighty years. With Tomonaga’s request for a second Midway strike in hand and (as far as Nagumo knows) no American carriers in the vicinity, he orders his reserve aircraft rearmed from their standard torpedo loadout — intended for use against enemy ships — to contact-fused bombs suitable for land attack.
This violates Yamamoto’s standing order, which specified that the reserve be kept armed with torpedoes in case American surface forces appeared.
Twenty-five minutes later, at 07:40, Tone’s delayed number 4 scout finally reaches Sector 5.
Contact. Ten surface ships, course 150°, speed 20 knots, 240 miles from the carriers.
Nagumo immediately demands clarification: are there any carriers? The scout takes until 08:20 to reply.
What appears to be a carrier.
Now Nagumo has his dilemma in full. A carrier — possibly more than one — is within striking distance. His reserve aircraft are in the process of being rearmed with land-attack bombs. His first-wave aircraft — Tomonaga’s bombers and their Zero escorts — are beginning to return to the fleet and must be recovered before he can respot and relaunch.
Rear Admiral Yamaguchi, commanding CarDiv 2 from Hiryu, signals immediately: Recommend commencing attacks with forces now available. A partial strike, launched immediately, might reach the Americans before they could strike.
Nagumo refuses.
He reverses the rearmament order at approximately 08:20: back to torpedoes. The ordnancemen in the hangar decks, who have just spent an hour changing loadouts, must do it again.
While the rearming reversal is underway — and Tomonaga’s returning first wave is stacking up overhead waiting to land — the Americans arrive.
Phase 3 — The Torpedo Squadrons: Sacrifice Without Hits
Between 07:50 and 09:18, Midway-based aircraft attack the Kido Butai in six separate waves — Army B-17s from high altitude, Navy TBF Avengers, USMC SBDs, B-26 Marauders. None score a hit.
At 09:18, fifteen TBD Devastator torpedo bombers of Torpedo Squadron 8 arrive over the Japanese formation.
They have no fighter escort. Their fighter escort, VF-8, lost contact with them. They are flying the TBD Devastator — a torpedo bomber already obsolete when the war began, too slow and too unmaneuver able to survive against modern fighters. They have to fly straight and level for the final torpedo run. Against 36 waiting Zeros.
My greatest hope is that we encounter a favorable tactical situation, but if we don’t and the worst comes to the worst, I want each of us to do his utmost to destroy our enemies. If there is only one plane left to make a final run-in, I want that man to go in and get a hit.
All fifteen TBDs are shot down. Twenty-nine of thirty pilots and aircrew are killed.
Twenty minutes later, at approximately 09:40, fourteen TBDs of Torpedo Squadron 6 from Enterprise arrive.
At approximately 10:05, twelve TBDs of Torpedo Squadron 3 from Yorktown begin their run.
Three torpedo squadrons. Forty-one aircraft launched. Thirty-five lost. Zero hits scored.
What the torpedo attacks accomplish is structural and cumulative rather than deliberate. The Japanese CAP has been fighting almost continuously for more than two hours, cycling fighters down to rearm and refuel in a constant stream. The Zeros have been forced low, chasing torpedo planes that must fly straight and level just above the wave tops.
Ensign Gay, floating in the Pacific, looks up.
Phase 4 — Three Carriers in Six Minutes
At approximately 10:22, Lieutenant Commander Richard Best, leading VB-6 from Enterprise, rolls into his dive over the Japanese formation.
Kaga takes multiple direct hits almost simultaneously.
Best’s small element — three planes — dives on Akagi. He releases at low altitude. One, perhaps two bombs, but Best’s is almost certainly direct.
Simultaneously — within minutes, possibly within seconds — Lieutenant Max Leslie’s VB-3 from Yorktown arrives over Soryu.
Within approximately six minutes, three of Japan’s four fleet carriers are dying.
Hiryu, operating with CarDiv 2 slightly separated to the north, survives.
Commander Rochefort's team identifies the target; the fake water-shortage message forces Japan's hand. Nimitz has the date, bearing, and distance of the attack before it launches. Without this, three US carriers have no ambush position.
The catapult malfunction is the key accident. Had the scout launched on time, Nagumo would have known about the US carriers before the 07:15 rearmament order. As it is, the rearmament cycle and the recovery of Tomonaga's first wave consume the critical 90 minutes.
The three torpedo squadrons' losses are catastrophic. What they purchase, through accumulated attrition of the CAP, is a defense gap. When dive bombers arrive at 19,000 feet at 10:22, the Zeros cannot climb to intercept.
VB-6/VS-6 hit Kaga (multiple direct hits); Best's element redirects and hits Akagi (1–2 hits, fires reach rearming hangar); VB-3 hits Soryu (3 hits). The carriers burn because their enclosed hangars are full of fuel vapor and loose ordnance from the double rearmament cycle. Not because planes were on deck.
Yamaguchi launches both of Hiryu's air groups. Yorktown takes 5 hits across two waves and is eventually sunk by submarine I-168 on June 7. But Enterprise's retaliation strikes hit Hiryu at ~17:00. By nightfall, all four Japanese carriers are dying.
The loss is not just the ships: it is the trained air groups that flew from them. Japan's carrier construction pipeline cannot replace four fleet carriers quickly. The US commissions Essex-class carriers from 1943. The Pacific War's trajectory is reversed, though the grinding attrition continues through 1945.
Phase 5 — Hiryu’s Counterstrike, and Hiryu’s End
Nagumo’s flag is in the water. He transfers to the cruiser Nagara, then to destroyer Nowaki — unable to communicate, unable to command, the fleet leader of the battle effectively gone.
Yamaguchi does not wait. His signal to Nagumo at the moment the Kido Butai was struck had been ignored; now he acts on his own authority. Within thirty minutes of the dive-bomber attack, Hiryu’s first counterstrike is in the air: eighteen D3A Vals and six Zeros, with a single target: the Yorktown.
They find Yorktown at approximately 12:05. Three bomb hits: the flight deck is holed, two boilers are out, Yorktown slows and stops. The Japanese pilots, not knowing there is more than one US carrier in the area, report that they have hit and disabled the only one.
Yorktown’s damage control is superb.
Two torpedo hits. Yorktown lists fifteen degrees. Fletcher transfers command to Spruance by radio. By 15:00, Yorktown is abandoned.
Spruance sends his answer at roughly 15:30: twenty-four dive bombers from Enterprise, assigned to the one carrier still floating.
Rear Admiral Yamaguchi composes a brief message to his crew, apologizes for his defeat, and goes below. He and Captain Kaku go down with the ship.
By nightfall on 4 June 1942, all four Japanese fleet carriers are burning. Soryu sinks at 16:10. Kaga at 19:25. Akagi and Hiryu will follow on June 5.
The Reckoning
- Fleet carriers lost4:1
- Aircraft lost (all types)1.7:1
- Personnel KIA8.4:1
- Destroyers/cruisers lost1:1
| Metric | Japan (Kido Butai) | United States | Ratio |
|---|---|---|---|
| Fleet carriers lost | 4 ships | 1 ships | 4:1 |
| Aircraft lost (all types) | 248 planes | 150 planes | 1.7:1 |
| Personnel KIA | 3,057 men | 362 men | 8.4:1 |
| Destroyers/cruisers lost | 1 ships | 1 ships | 1:1 |
Japan lost Akagi, Kaga, Soryu, and Hiryu — and with them approximately 248 carrier aircraft and roughly 3,057 men.
- total 496 planes
- Kido Butai embarked (248 aircraft) → 1st Midway strike wave launched (~108): 108 planes (21.8%)
- Kido Butai embarked (248 aircraft) → CAP fighters (continuous): 36 planes (7.3%)
- Kido Butai embarked (248 aircraft) → Reserve strike force (rearming/recovering): 104 planes (21.0%)
- 1st Midway strike wave launched (~108) → Lost in combat: 18 planes (3.6%)
- 1st Midway strike wave launched (~108) → Lost when carriers sank: 60 planes (12.1%)
- CAP fighters (continuous) → Lost in combat: 20 planes (4.0%)
- CAP fighters (continuous) → Lost when carriers sank: 12 planes (2.4%)
- Reserve strike force (rearming/recovering) → Lost when carriers sank: 104 planes (21.0%)
- 1st Midway strike wave launched (~108) → Survived to fight (few): 30 planes (6.0%)
- CAP fighters (continuous) → Survived to fight (few): 4 planes (0.8%)
Go deeper: the pilot-loss debate (Parshall and Tully's corrective)
The traditional narrative holds that Midway destroyed Japan’s irreplaceable core of experienced carrier aviators — the veterans who had trained for years and were impossible to replace. Parshall and Tully’s research modifies this substantially. They found, from the Japanese casualty records, that pilot losses at Midway — while significant — were not the primary cause of Japan’s subsequent carrier impotence. The loss of the experienced maintenance crews, the ordnancemen, the aviation technicians who had operated together for years, was as important as the aircrew losses themselves. More significant still was the structural destruction: four fleet carriers removed from Japan’s order of battle permanently. No matter how many pilots survived, the ships they needed to fly from were gone. Japan commissioned new carriers through 1943–44, but the pace of US construction — the Essex class — would overwhelm them regardless. Midway’s decisive impact on Japan’s air power lay primarily in the irreplaceable carriers, not solely in the pilots.
The United States lost Yorktown — finally, on 7 June — and USS Hammann.
American aircraft losses — approximately 144–150 planes of all types — were severe.
What Midway Decided — and What It Did Not
The popular verdict assigns Midway the role of the Pacific War’s turning point — the moment the tide reversed, after which American victory was inevitable. It is a cleaner story than the facts support.
What Midway unambiguously decided was the defeat of Operation MI. Japan’s plan — to seize Midway, extend its defensive perimeter, and destroy the American carrier force in the battle that followed — failed completely. The perimeter was not extended. The American carrier force was not destroyed. It was Japan’s striking force that was destroyed.
What Midway also decided, more structurally, was the carrier balance of the Pacific.
The battle also decided something about intelligence and the American way of war. Nimitz had acted on Rochefort’s estimate with a confidence that, had the intelligence been wrong, would have been catastrophic — three carriers committed to an ambush position that turned out to be empty. It was not wrong.
Pearl Harbor has now been partially avenged. Vengeance will not be complete until Japanese sea power has been reduced to impotence.
The “five-minute miracle” is a comforting story. It says that Midway was won by luck — by a narrow margin of time that just happened to favor the Americans. The real story is less cinematic and more demanding. It was won by the systematic, careful work of analysts in a basement at Pearl Harbor who read Japanese radio traffic for months. It was won by Nimitz’s decision to trust their analysis and commit his carriers to a position. It was won by the torpedo squadron pilots — Waldron, Lindsey, Massey, and the men behind them — who flew their obsolete planes into certain death without scoring a single hit, and who thereby helped exhaust a fighter defense that could not be reconstituted in time.
Go deeper: the myth of the 'five minutes' — Fuchida and Parshall/Tully
Mitsuo Fuchida, the Japanese naval aviator who led the Pearl Harbor strike, published Midway: The Battle That Doomed Japan in 1955. His account included the dramatic claim that Japanese carriers were approximately five minutes from launching a decisive counterstrike against the American fleet when the dive bombers arrived — hence the “five-minute miracle.” Fuchida had not been present at the decisive moment (he was recovering from an appendectomy and watched from the bridge). Parshall and Tully’s research identified his account as fabricated on multiple key points, drawing on Japanese carrier action reports, elevator cycle times, and basic physics of carrier operations. The flight decks were clear of armed aircraft because they had to be — the CAP was constantly cycling. A full strike launch was at minimum 30–60 minutes from being ready. The bombs hit hangars full of fuel vapor and rearming ordnance, not a flight deck crowded with gassed-up planes. Fuchida’s “five minutes” was invented drama. The real story — a cascade of rational decisions, an unlucky catapult malfunction, three desperate torpedo attacks, and a navigation error that accidentally split a dive-bomber group — is more instructive precisely because none of it was miraculous.
And it was won by the fact, which Yamamoto had gambled away, that Japanese carriers on 4 June 1942 were exposed, without battleship anti-aircraft cover, in range of American dive bombers who had been waiting for them for three days.
The ocean turned that morning. It never turned back.
Strategic Aftermath
Event 1 of 7: 7 Jun 1942, Yorktown sinks — the full cost of the battle is counted
Yorktown sinks — the full cost of the battle is counted
The last of the Midway combatants goes down. Japan has lost four fleet carriers; the US one. The strategic arithmetic is settled.
US landings on Guadalcanal — the first American offensive
Using the naval breathing room created by Midway, the US Marines land on Guadalcanal and Tulagi. The six-month Guadalcanal campaign is still bitterly contested, but the strategic initiative now lies with the US.
Naval Battle of Guadalcanal — Japan's last major offensive effort
The final major Japanese naval counterattack to retake Guadalcanal is defeated. Japan loses two battleships. After this, Japan shifts from offensive to defensive operations in the South Pacific.
Japan evacuates Guadalcanal
Japanese forces complete a secret night withdrawal. Six months of brutal ground and naval combat end in American possession of the island. The next phase — the Central Pacific drive — can now begin.
USS Essex commissioned — the new carrier force takes shape (December 1942)
The first Essex-class fleet carrier (CV-9), product of a pre-war construction program, is commissioned on 31 December 1942. By 1944, fast carrier task forces will have overwhelming numerical superiority over Japan's rebuilt carrier force.
Battle of the Philippine Sea — 'The Great Marianas Turkey Shoot'
The rebuilt Japanese carrier force (9 carriers, including Shokaku and Taiho) confronts 15 US carriers. Japan loses 3 carriers and approximately 600 aircraft and crews. The aircrew replacement pipeline destroyed at Midway and in subsequent battles has made Japanese naval aviation a shadow of what fought at Coral Sea and Midway.
Japan surrenders
Three years and two months after Midway. The ocean has not turned back.
Midway did not end the war. It changed its character. Before 4 June 1942, the Pacific War was a contest between roughly equal carrier forces, with Japan holding the initiative and the best-trained striking force. After 4 June, the war was an attritional campaign that Japan could not win on the timetable available to it.
Japan’s naval aviation — the specific combination of hulls, aircraft, and trained pilots and crews that had made the Kido Butai the most formidable carrier force in the world — was not rebuilt to competitive parity before US industrial production made the question irrelevant. At the Philippine Sea in June 1944, the rebuilt Japanese carrier force flew into a slaughter. At Leyte Gulf in October 1944, Japan’s remaining carriers were used as decoys. The trajectory from 4 June 1942 to 2 September 1945 runs directly through Midway.
The lesson Nimitz drew was not that luck had saved the Pacific Fleet. It was that intelligence, carefully built and courageously acted on, could neutralize any tactical disadvantage. The lesson Yamamoto drew — had he survived the war to articulate it — might have been simpler: never assume the enemy is where you left him.
The ocean does not favor the side that was last correct. It favors the side that is correct now.